문제제기

- 우리가 1장에서 만들었던 게임에 대해 다시 말해보자, 1장에서 우리는 Strategy Pattern을 써서, Class 별로 무기를 사용하는 행위(Attack)을 구현했엇다.

- Attack Strategy를 구현한 코드가 아래처럼 되어있다고 가정해보자,

public class AxeAttack implements AttackBehavior{
	String[] available = {"knight","mknight"};
	
	@Override
	public void attack(String className) throws Exception {
		if(Arrays.stream(available).anyMatch(className::equals)) {
			System.out.println("도끼 공격이다!!!");
		} else {
			throw new Exception("your name is " + className);
		}
	}
}


- 위 코드처럼 knight 클래스와 Macgic knight (마검사) 만 axe를 쓸 수 있도록 코딩되어있다.

public class Wizard extends Person{

	public Wizard(AttackBehavior attack) {
		this.className = "wizard";
		this.attackBehav = attack;
	}
}

- Wizard 클래스가 Axe를 쓰려고 하면 어떻게 될까?


- 위와같이 오류가 날 것이다. 그러면 어떻게 이 상황을 해결할 수 있을까?


어댑터 패턴 개요

- 위 문제를 Adapter 패턴을 통해 우리는 해결해 볼 수 있다.


-일단 어댑터 패턴이 무엇인지부터 살펴보면, 말그대로 중간에 어댑터(돼지코)를 둬서, 원래의 Object를 유럽플러그에서도 사용 할 수있게 만드는 것이다.


조금더 복잡한 만능리모컨 설계

 -우리가 6-1에서 만들었던 간단한 만능리모컨 프로토타입이 마음에 들었는지, 이번에는 업체에서 좀더 복잡한 만능리모컨 을 설꼐해달라고 부탁했다.

- 위와같이 3쌍의 On/Off 버튼이 있는 만능리모컨을 만든다고 가정해보자,

- 우리는 먼저 테스트용도로 이 리모컨에 GarageDoor, CDplayer, Light 를 제어해보기로 했다.


만능 리모컨을 테스트하게 될 3가지 Receiver들


- 가장먼저 Inovoker에 해당하는 리모컨부터 객체로 디자인해보자.

public class RemoteControl {
	Command[] onCommands;
	Command[] offCommands;
	Command undoCommand;

	public RemoteControl() {
		onCommands = new Command[6];
		offCommands = new Command[6];
		
		Command noCommand = new NoCommand();
		for (int i = 0; i < 6; i++) {
			onCommands[i] = noCommand;
			offCommands[i] = noCommand;
		}
		undoCommand = noCommand;
	}
	
	public void setCommand(int slot, Command onCommand, Command offCommand) {
		onCommands[slot] = onCommand;
		offCommands[slot] = offCommand;
	}
	
	public void onButtonPushed(int slot) {
		onCommands[slot].execute();
		undoCommand = onCommands[slot];
	}
	
	public void offButtonPushed(int slot) {
		offCommands[slot].execute();
		undoCommand = onCommands[slot];
	}
	
	public void undoButtonPushed() {
		undoCommand.undo();
	}
	
	@Override
	public String toString() {
		StringBuffer st = new StringBuffer();
		st.append("\n-------- Remote Control-------------\n");
		for (int i = 0; i < onCommands.length; i++) {
			st.append("[slot"+ i + "\n"+ onCommands[i].getClass().getCanonicalName()+ " "
					+ "  "+ offCommands[i].getClass().getName()+"\n");
		}
		
		return st.toString();
	}
}


- 위와같이 On, Off Command를 6개씩 넣을 수 있는 배열을 내부변수로 가지고있고, 또한 undo를 할 수있는 command를 저장하였다.

- 또한 상태 확인을 위해 toString 객체 또한 Override 하여 만들어 주었다.


-이제 다음으로 Invoker에서 트리거 되는 command 객체를 만들어보자.


- 위와 같이 Receiver에 행동 하나하나가 그에 대응되는 Command 객체로 만들어진다.

- 많은 커맨드가 있지만 위 Command중 로직이 가장 복잡한 Cdplayer Command 만 만들어보자.

public class CdPlayerOnCommand  implements Command{
	CdPlayerReceiver cdPlayer;
	
	public CdPlayerOnCommand(CdPlayerReceiver cdPlayer) {
		this.cdPlayer = cdPlayer;
	}

	@Override
	public void execute() {
		cdPlayer.on();
		cdPlayer.setCd();
		cdPlayer.setVolume(11);
	}
}


public class CdPlayerOffCommand  implements Command{
	CdPlayerReceiver cdPlayer;
	
	public CdPlayerOffCommand(CdPlayerReceiver cdPlayer) {
		this.cdPlayer = cdPlayer;
	}

	@Override
	public void execute() {
		cdPlayer.off();
	}
}


- 위와같이 command내부 execute command 안에는 여러개의 Receiver에 로직이 들어갈 수 있다. (원하는 행동을 구동시키기 위하여)

- 다른 Command들은 충분히 쉬우니 생략하도록 하겠다.


만능리모컨 사용해보기


- 위와 같은 클래스다이어그램의 만능리모컨이 완성 되었다. 한번 사용해보도록하자


public class RemoteLoader {

	public static void main(String[] args) {
		RemoteControl remoteControl = new RemoteControl();
		
		LightReceiver lightReceiver = new LightReceiver();
		GarageDoorReceiver garageDoorReceiver = new GarageDoorReceiver();
		CdPlayerReceiver cdPlayerReceiver = new CdPlayerReceiver();
		
		LightonCommand lightonCommand = new LightonCommand(lightReceiver);
		LightOffCommand ligOffCommand = new LightOffCommand(lightReceiver);
		
		GrageDoorDownCommand garDoorDownCommand = new GrageDoorDownCommand(garageDoorReceiver);
		GarageDoorUpCommand garageDoorUpCommand = new GarageDoorUpCommand(garageDoorReceiver);
		
		CdPlayerOffCommand cdPlayerOffCommand = new CdPlayerOffCommand(cdPlayerReceiver);
		CdPlayerOnCommand cdPlayerOnCommand = new CdPlayerOnCommand(cdPlayerReceiver);
		
		remoteControl.setCommand(0, cdPlayerOnCommand, cdPlayerOffCommand);
		remoteControl.setCommand(1, garDoorDownCommand, garageDoorUpCommand);
		remoteControl.setCommand(2, lightonCommand, ligOffCommand);
		
		remoteControl.onButtonPushed(0);
		remoteControl.offButtonPushed(0);
		
		remoteControl.onButtonPushed(1);
		remoteControl.offButtonPushed(1);
		
		remoteControl.onButtonPushed(2);
		remoteControl.offButtonPushed(2);
		
		remoteControl.onButtonPushed(3);
		remoteControl.offButtonPushed(3);
		
	}

}


+ Undo 기능 만들기.

Undo 기능은 만들기 참 쉽다. Command 내의 On에 반대되는 기능만 추가해주면 된다.


1) 다음과같이 Command interface에 Undo method만 추가해준다.


2) Cdplayer command 에서 예시로 구현해 보겠다. OnCommand에 반대되게Undo를 작성해준다.

public class CdPlayerOnCommand  implements Command{
	CdPlayerReceiver cdPlayer;
	
	public CdPlayerOnCommand(CdPlayerReceiver cdPlayer) {
		this.cdPlayer = cdPlayer;
	}

	//...omit...
    
    
	@Override
	public void undo() {
		cdPlayer.off();
	}

}


3) Invoker 객체에서 Undo를 포함하는 객체를 다음과같이 저장할수 있게한뒤(6개나 필요없다.) 쓸수있는 Method를 정의해준다.

public class RemoteControl {
	Command[] onCommands;
	Command[] offCommands;
	Command undoCommand;

	public RemoteControl() {
		onCommands = new Command[7];
		offCommands = new Command[7];
		
		Command noCommand = new NoCommand();
		for (int i = 0; i < 7; i++) {
			onCommands[i] = noCommand;
			offCommands[i] = noCommand;
		}
		undoCommand = noCommand;
	}
	
    public void onButtonPushed(int slot) {
		onCommands[slot].execute();
		undoCommand = onCommands[slot];
	}
	
	public void offButtonPushed(int slot) {
		offCommands[slot].execute();
		undoCommand = onCommands[slot];
	}

	// ... omit ...
    
    
	public void undoButtonPushed() {
		undoCommand.undo();
	}
}


- 차이가 보이는가? 커맨드가 실행될때마다 슬롯을 UndoCommand에 저장시켜서 언제나 Undo method를 실행할 수 있게준비한다.


4) 메인에서 사용방법이다.

public class RemoteLoader {

	public static void main(String[] args) {
		RemoteControl remoteControl = new RemoteControl();
		
		GarageDoorReceiver garageDoorReceiver = new GarageDoorReceiver();

		CdPlayerOffCommand cdPlayerOffCommand = new CdPlayerOffCommand(cdPlayerReceiver);
		CdPlayerOnCommand cdPlayerOnCommand = new CdPlayerOnCommand(cdPlayerReceiver);
		
		
		remoteControl.onButtonPushed(0);
		remoteControl.undoButtonPushed();
		remoteControl.offButtonPushed(0);
		
		// ... omit ....
		
	}

}


- 위와같이 사용할 수 있다.

'To be Developer > DesignPatterns' 카테고리의 다른 글

6-1.Command Pattern (Simple)  (0) 2020.01.10
5.Singleton Pattern  (0) 2020.01.07
4-2 Factory Pattern (Abstract Factory Pattern)  (0) 2020.01.05
4-1.Factory Pattern (Factory Method Pattern)  (0) 2020.01.04
3.Decorator Pattern  (0) 2020.01.02

문제 제기

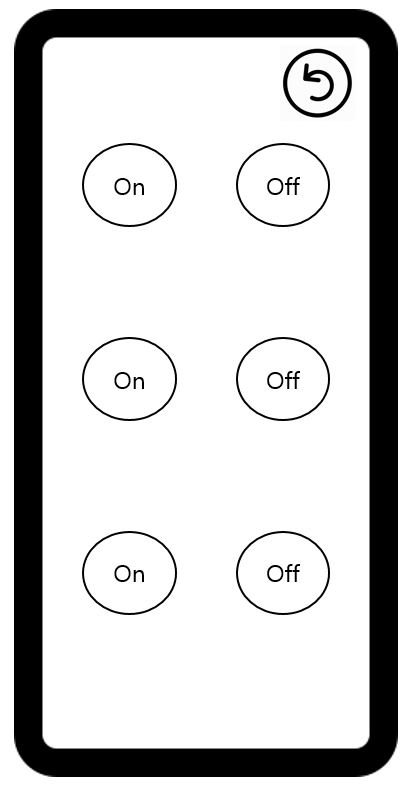
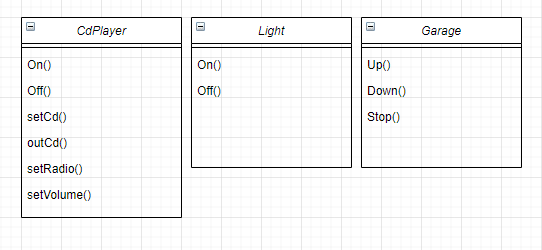
만능 리모컨 회사에서 여러 물품에 블루투스 리모컨 시스템을 사용할 수 있는 환경을 만들어달라고 의뢰를 해왔다.
의뢰를 들어온 물품 Object 들의 시그니쳐는 다음과 같이 제공되었다.

물론 더 많겠지만 일단 4개만 해보자.


- 공통된 Method가 존재하기도 하는데 대부분 겹치지않는다. 공통된 행위가 없어서 Starategy 패턴으로 뺄수도 없을것 같고 이럴땐 어떻게 해야할까?


커맨드 패턴 살펴보기

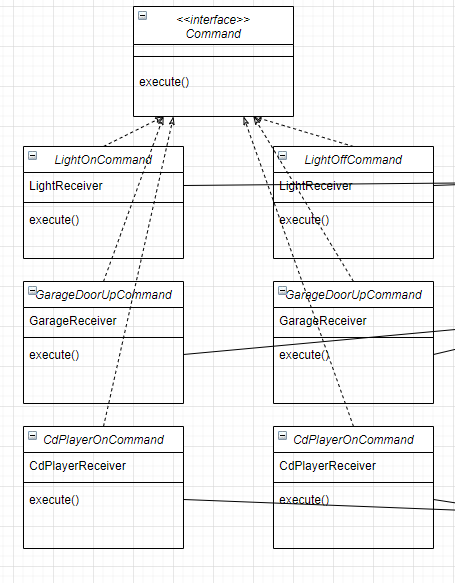
- 가장 먼저 커맨드 패턴의 클래스 다이어그램부터 살펴보자


- 클래스 다이어그램에는 가장 핵심적인 요소 4가지가 있다. Client, Invoker, Command, Receiver 이다.

- 대소 관계로 비교하기 좀그렇지만 Client는 {Invoker, Command, Receiver}를 다 가지고 있다.
그리고 클라이언트의 요청에따라 Invoker > Command > Receiver 순서로 트리거 된다. 그러나 그전에 클라이언트에서 해주어야 할 작업이 있다. 이 작업을 순서대로 풀어 써 보자면

1) Client는 가장 먼저 Receiver를 생성 후 Command에 넘겨 Command를 생성해준다.
2) 다음으로 클라이언트는 CommandInvoker에게 Set 해주고 Invoker를 생성해준다
3) client는 필요할때 Invoker에게 invoke()를 요청한다.
4) 이렇게 되면 Invoker.Invoke() -> Command.execute() -> receiver.action() 순으로 실행된다.


이를 그림으로 표현 한 것이다.


간단한 리모컨에 커맨드 패턴 끼얹기

- 자 위와 같이 간단한 On/Off 버튼이 있다고 먼저 가정해보자.


- 웜업으로 아까 받은 여러개의 클래스 다이어그램에서 Light의 On()과 Garage의 Up()만 구현해보자.

1) 각각 Receiver를 구현해보자.

public class GarageDoorReceiver {
	
	public void up() {
		System.out.println("garage up");
	}
	
	public void down() {
		
	}
	
	public void stop() {
		// TODO Auto-generated method stub

	}	
	
	public void lightOn() {
		
	}
	
	public void lightOff() {
		
	}
}
public class GarageDoorReceiver {
	
	public void up() {
		System.out.println("garage up");
	}
	
	public void down() {
		
	}
	
	public void stop() {
		// TODO Auto-generated method stub

	}	
	
	public void lightOn() {
		
	}
	
	public void lightOff() {
		
	}
}


2) Command Interface를 만들고, Command 구현체를 각각 만들어주자

public interface Command {
	public void execudte();
}
public class LightonCommand implements Command{
	LightReceiver light;
	
	public LightonCommand(LightReceiver light) {
		this.light = light;
	}
	
	@Override
	public void execudte() {
		light.on();
	}

}
public class GarageCommand implements Command{
	GarageDoorReceiver gar;
	
	public GarageCommand(GarageDoorReceiver gar) {
		this.gar = gar;
	}
	
	@Override
	public void execudte() {
		gar.up();
	}

}


3) 위 두가지 Command를 실행해줄 SimpleRemotecontrol Invoker 를 만들어보자

public class SimpleRemotecontrol {
	Command com;
	
	public SimpleRemotecontrol() {
		// TODO Auto-generated constructor stub
	}
	
	public void setCom(Command com) {
		this.com = com;
	}
	
	public void btnPressed() {
		com.execudte();
	}
	
}


4) 한번 Client (메인함수) 에서 실행시키고 결과를 보자.

public class RemoteControlTest {

	public static void main(String[] args) {
		SimpleRemotecontrol remote = new SimpleRemotecontrol();
		LightReceiver light = new LightReceiver();
		LightonCommand lightOnCommand = new LightonCommand(light);
		
		remote.setCom(lightOnCommand);
		remote.btnPressed();
		
		GarageDoorReceiver ga = new GarageDoorReceiver();
		GarageCommand garageCommand = new GarageCommand(ga);
		
		remote.setCom(garageCommand);
		remote.btnPressed();
	}

}


하나의 인보커로 두가지 커맨드가 잘 실행 되었다.!


- 간단하게 커맨드 패턴을 활용하여 두가지 Light, Garage Receiver를 구현해보았다.


- 위 소스의 클래스 다이어그램은 아래와 같이 그릴 수 있다.


커맨드 패턴의 정의

- 커맨트 패턴의 공식적인 정의는 다음과 같다.

커맨드 패턴
커맨드 패턴을 이용하면 요구사항을 객체로 캡슐화 할 수 있으며, 매개변수를 써서 여러가지 다른 요구사항을 집어넣을수도 있다. 또한 요청내역을 큐에저장하거나, 로그로 기록할 수도 있으며, 작업취소 기능도 지원합니다.


-간단한 커맨드 패턴에 작업취소등 추가적인 작업은 다음시간에 해보겠다.

- 결국 커맨드 패턴이란, 일련의 행동을 특정 리시버로 연결시켜 요구사항을 커맨드로 캡슐화 한것이다. 외부에서 볼때는 어떤 리시버가 실행되는지, 어떤 객체가 리시버역할을하는지, 그 리시버에서 실제로 어떤 수행을 하는지 알 수 없다. 그냥 execute()가 실행되면 리시버가 실행된다는 것만 알 수 있을뿐이다. 또한 우리는 Receiver를 Command객체로 구현하므로써, 매개변수로써 여러가지 다른 리시버들을 실행 시켰다.

+ Recent posts